Beginning Sous Vide
Low Temperature Recipes and Techniques for Getting Started at Home
By Jason Logsdon
Presented By CookingSousVide.com
Also available in full in paperback from Amazon.com at
Beginning Sous Vide

Copyright © 2010 by Primolicious LLC
All rights reserved. Printed in the United States of America. No part of this document may be used or reproduced in any manner whatsoever without written permission except in the case of brief quotations embodied in critical articles and reviews.
Cover Photo Credit:
TheWrittenGeek
Preface
Thanks for reading my book!
This document contains the first 6 chapters from
Beginning Sous Vide: Low Temperature Recipes and Techniques for Getting Started at Home. It also includes the full
Resources section and the entire
Beef Roasts and Tough Cuts section and it's corresponding Time and Temperature Chart.
Please pass this guide on to anyone you know that might benefit from reading it. You can also
download this sample guide as a PDF and pass it along.
The full book (with less pictures) is available as a
paperback cookbook from Amazon.com or as a
PDF download. In addition to the first 6 chapters that are included in this PDF we include another 150 pages of content.
The additional content has recipes for steaks, pork, fish, vegetables, chicken, duck, lamb, and turkey. This brings the total recipe count over 100 sous vide recipes.
It also has time and temperature combinations for each of those subjects. That's over 400 combinations for 175 cuts of meat and types of fish and vegetables.
If you enjoy this PDF and want more information we hope you'll check out the full version of it.
Thanks, and happy sous viding!
Jason Logsdon
www.CookingSousVide.com
Table of Contents
Intro to Sous Vide
Sous vide is quickly becoming one of the hottest new culinary techniques. Here are the ins and outs you need to know to get started.
If you have any questions you can ask them in the "How-Tos" section on our website. Just post your question and other sous vide cooks will weigh in with their answers.
You can find it on our website at:
Cooking Sous Vide
History of Sous Vide
Sous vide, or low temperature cooking, is the process of cooking food at a very tightly controlled temperature, normally the temperature the food will be served at. This is a departure from traditional cooking methods that use high heat to cook the food, which must be removed at the exact moment it reaches the desired temperature.
Sous vide was first used as an upscale culinary technique in kitchens in France in the 1970s and traditionally is the process of cooking vacuum sealed food in a low temperature water bath. This process helps to achieve texture and doneness not found in other cooking techniques, as well as introducing many conveniences for a professional kitchen. Sous Vide has slowly been spreading around the world in professional kitchens everywhere and is finally making the jump to home kitchens.
As sous vide has become more popular and moved to the home kitchen the term now encompasses both traditional "under vacuum" sous vide and also low temperature cooking. Some preparations rely on the vacuum pressure to change the texture of the food but in most cases the benefits of sous vide are realized in the controlled, low temperature cooking process. This means that fancy vacuum sealers can be set aside for home sealers or even ziploc bags.
How Sous Vide Works
The basic concept of sous vide cooking is that food should be cooked at the temperature it will be served at. For instance, if you are cooking a steak to medium rare, you want to serve it at 131°F.
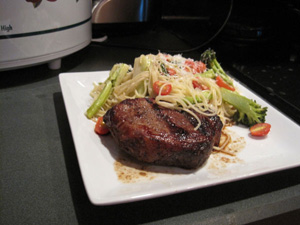
With traditional cooking methods you would normally cook it on a hot grill or oven at around 400°F-500°F and pull it off at the right moment when the middle has reached 131°F. This results in a bulls eye effect of burnt meat on the outside turning to medium rare in the middle. This steak cooked sous vide would be cooked at 131°F for several hours. This will result in the entire piece of meat being a perfectly cooked medium rare. The steak would then usually be quickly seared at high heat to add the flavorful, browned crust to it.
There are two basic components to sous vide cooking at home: temperature and time. Each one of these can affect the end quality, texture, and taste of sous vide dishes. Learning to understand how they affect the food is one of the most important things as you begin sous vide cooking.
Temperature
All sous vide cooking is done at temperatures below the boiling point of water and normally not above 185°F. You usually cook the food at the temperature you want it served at, so most settings are between 120°F and 185°F, depending on the food being prepared.
While the range of temperature used in sous vide is much less variable than for traditional cooking, the precise control of the temperature is of great importance. When you set your oven at 400°F it actually fluctuates about 50 degrees, sending it between 375°F and 425°F, which is fine when cooking at high temperatures. When cooking sous vide, the temperature of the water determines the doneness of your food, so a 50°F fluctuation would result in over cooked food. Most sous vide machines fluctuate less than 1°F and the best are less than 0.1°F.
This precision is why many sous vide machines are very expensive. However, there are many more home machines available in the last few years, some good do-it-yourself kits, and even some ways to accomplish "accurate enough" sous vide on the cheap. We will discuss many of your options in our
Sous Vide Equipment section.
Time
Cooking tenderizes food by breaking down its internal structure. This process happens faster at higher temperatures. Because sous vide is done at such low temperatures the cooking time needs to be increased to achieve the same tenderization as traditional techniques.
Also, your window of time to perfectly cooked food is much longer than with traditional cooking methods because you are cooking the food at the temperature you want it to end up at, rather than a higher temperature. This also allows you to leave food in the water bath even after it is done since keeping it at this temperature does not dry out the food, up to several hours longer for tougher cuts of meat. However, be careful not to take this concept too far as food can still become overcooked by sous vide, many times without showing it externally.
Temperature and Time Together
The power of sous vide cooking comes from precisely controlling both temperature and time. This is important because of the way meat reacts to different temperatures.
At 120°F meat slowly begins to tenderize as the protein myosin begins to coagulate and the connective tissue in the meat begins to break down. As the temperature increases so does the speed of tenderization.
However, meat also begins to lose its moisture above 140°F as the heat causes the collagen in the cells to shrink and wring out the moisture. This happens very quickly over 150°F and meat becomes completely dried out above 160°F.
Many tough cuts of meat are braised or roasted for a long period of time so the meat can fully tenderize, but because of the high temperatures they can easily become dried out. Using sous vide allows you to hold the meat below the 140°F barrier long enough for the slower tenderization process to be effective. This results in very tender meat that is still moist and not overcooked. (For more information about heat and it's effects on meat I suggest
On Food and Cooking by Harold McGee, it has about all the food science information you could ever want.)
Benefits of Sous Vide
Just like any method of cooking there are many reasons to use the sous vide technique, depending on what you are trying to accomplish.
Moisture
Because food cooked in the sous vide style is sealed it does not lose moisture or flavor to the cooking medium. The sous vide pouch holds in all the liquid released by the food. This is especially apparent when compared to traditional techniques such as roasting and braising where the meat has a tendency to dry out.
Also, as discussed in the Temperature and Time Together section, the low heat used in sous vide prevents the collagen from constricting and forcing out more moisture. Controlling the collagen combined with the vacuum sealing results in very moist foods.
Tenderness
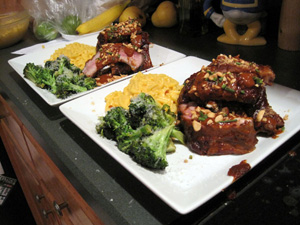
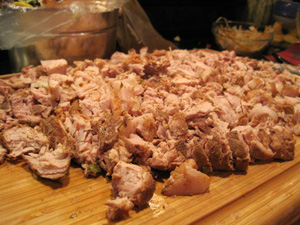
The sous vide technique allows you to cook tough cuts of meat at an incredibly low temperature, allowing you to tenderize them while remaining perfectly medium-rare. This is very effective for shanks, roasts and other pieces of meat that are typically braised or roasted, but often dry out or get overcooked in the process.
Texture
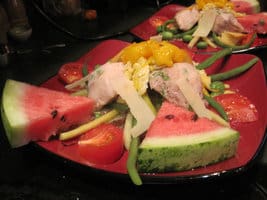
Using sous vide to cook food also exposes new textures. This is caused by two things. First, the vacuum sealing process can make lighter foods denser, like watermelon. Second, the lack of high heat used in cooking can result in silky and smoothly textured food that is impossible to replicate with traditional cooking techniques.
Convenience
Sous vide introduces many time saving and general convenience strategies for the home cook. We discuss several in more detail in the
Tips and Tricks section ranging from "Beer Cooler Sous Vide to hassle-free freezer steaks.
Disadvantages of Sous Vide
Like any culinary technique, sous vide cooking also has its drawbacks. Fortunately, the first two are slowly disappearing as sous vide becomes a more prevalent technique and the affect of the third can be minimized with planning.
Sous Vide Information
Even though the amount of information about sous vide has increased a lot over the past few years it can still be hard to find specific information. While there is information out there on websites, forums, books, and magazines, there often isn't a single repository you can use to collect it. This has meant a lot of time lost on research before even getting started.
This book will be enough to get you familiarized with sous vide and started on many recipes. It will also direct you where to find more information as you become more experienced with the technique.
High Cost of Sous Vide Equipment
The second disadvantage is the high cost of good sous vide equipment. Until recently, the only effective way to do sous vide cooking was by using thermal immersion circulators or thermal circulating water baths, both of which run more than a thousand dollars.
Now, some less-expensive alternatives are turning up, such as sous vide cooking controllers, that reduce the cost of getting started to a few hundred dollars. In the last year there have also been several high quality devices released specifically for the home chef that offer very good temperature control.
This book covers many different options for getting started in the
Sous Vide Equipment section.
Time
The third potential disadvantage is the length of time required to cook some items with sous vide. Even more than braising or roasting, most sous vide cooking requires long periods of time. For many tougher cuts of meat, such as short ribs or brisket, it is recommended you cook them at about 130°F for around 36 hours. Of course, the majority of this time you don't have to do a single thing to them and the energy expended is minimal. There are also several types of sous vide cooking that can be done in 30 to 60 minutes, especially for fish and chicken dishes.
Hype
Since sous vide is currently a hip technique many people talk about how it is the future of cooking. While sous vide can do many extraordinary things it will never replace traditional techniques, any more than the oven replaced grilling.
Many people try to capitalize on the popularity of sous vide by trotting out various un-inspired preparations. Just be aware that like any cooking technique sous vide can be done poorly, especially when applied to the wrong dishes, or by a skilled chef it can be done exquisitely.
Anytime you approach a dish you should think about what is the best technique to use, and sous vide will not always be the answer.
Basic Sous Vide Technique
At the heart of sous vide cooking is a very simple process. While there are variations within each dish, almost every sous vide meal follows the same steps.
Flavor the Food
Just like many traditional methods, you often times flavor the food before cooking it. This can be as simple as a sprinkling of salt and pepper or as complicated as adding an elaborate sauce, spice rub, or even smoking the food. Depending on the type of seasoning it can either be rubbed directly onto the food itself or added into the pouch with the food.
If you are using a normal home vacuum sealer and want to add more than a little liquid, freeze the liquid before adding it to the pouch. This way the process of vacuum sealing will not suck out the liquid. Otherwise, you can normally use food grade ziploc bags to seal food with liquids.
In our various food sections we give some tips and suggested recipes for flavoring your food. But remember, just like traditional cooking a lot of the fun comes with experimenting.
Seal the Food
Once the seasoning and food have been added to the pouch, remove the air and seal it closed. Removing the air results in closer contact between the food and the water in the water bath. This helps to facilitate quicker cooking since water transfers heat more efficiently than air.
Sealing the food can be done with anything from ziplocs or food grade plastic wrap to a FoodSaver Vacuum Sealer or even a chambered vacuum sealer.
Some vacuum sealers have different strengths of vacuum to seal the bag and can be used to affect the texture of some types of food.
Various vacuum sealing options are discussed in the Vacuum Sealers section of the
Sous Vide Equipment chapter.
Heat the Water
Simply bring the water bath up to the temperature you will cook at. This water bath will normally be the same temperature that you will want your food to end up at.
Depending on the type of heat regulator, you may be able to have the food in the water while it heats. For others, it is best to preheat the water before placing the food in it due to early fluctuations in temperature.
The Temperature Regulation section of the Sous Vide Equipment chapter discusses the various temperature regulators and water baths available from a pot on the stove to a professional immersion circulator.
Cook the Food
Put the food pouch in the water and let it cook for the amount of time specified in the recipe or on the Time and Temperature chart. For items that are cooked for longer amounts of time it can be good to rotate the food every 6 to 10 hours, especially if you are using less precise sous vide equipment.
At some higher temperatures the sous vide pouches can float due to air released from the food. If that happens you might have to use a plate or bowl to weigh them down.
Finish the Dish
To get a good finish and texture to your food, especially meats, many times it is advisable to quickly sear the meat in a saute pan or with a blow torch. Some meals also call for other methods of finishing the food, such as breading and deep-frying for chicken or mashing potatoes with cream and butter for mashed potatoes.
You can also quickly chill the food in an ice bath and then refrigerate or freeze the food for later re-heating.
Sous Vide Safety
Safety is always a concern with any cooking method. Here are the basics you need to understand so you can begin to see how sous vide and food safety interact.
If you are interesting in staying up to date with the work we are doing in sous vide feel free to follow us on Twitter. We post articles we find interesting, links to new recipes, and other items of interest.
We are
@jasonlogsdon_sv
Sous vide is a new and largely untested method of cooking. It potentially carries many inherent health risks that may not be fully understood. We have done our best to provide the latest information and what is currently understood about this form of cooking.
However, we feel that anyone undertaking sous vide cooking, or any other method of cooking, should fully inform themselves about any and all risks associated with it and come to their own conclusions about its safety. Following anything in this book may make you or your guests sick and should only be done if you are fully aware of the potential risks and complications.
There are two main concerns when it comes to sous vide cooking, they are pathogens and the dangers of cooking in plastic.
Pathogens, Bacteria and Salmonella in Sous Vide Cooking
One large safety concern with sous vide that has been studied in great detail deals with the propagation of bacteria at various temperatures, especially salmonella. Salmonella only thrive in a certain range of temperatures, from about 40°F to 130°F, often referred to as the "danger zone".
This danger zone is why we refrigerate our foods until an hour or so before we are ready to cook them. It is also why we cook our foods to specific temperatures before we eat them.
The biggest misconception about bacteria and the danger zone is that any food in the temperature range is not safe and as soon as you move above 130°F the food instantly becomes safe. The truth is that the bacteria begin to die in direct relation to the temperature they are exposed to.
The best way to visualize this is to think about how we humans react to heat. We do fine in climates where the temperature is below 100°F. However, once it begins to climb around 110°F or 120°F you begin to hear about deaths in the news due to heat stroke. If the temperature were to raise to 200°F stepping outside for more than a few seconds would kill you.
Bacteria behave in the exact same way. They begin to die at around 130°F to 135°F and 165°F just about instantly kills them. You can see this in the chart below, based on the
USDA data. At 136°F it takes about 63 minutes for your food to be safe and at 146°F it only takes 7 minutes to become safe.
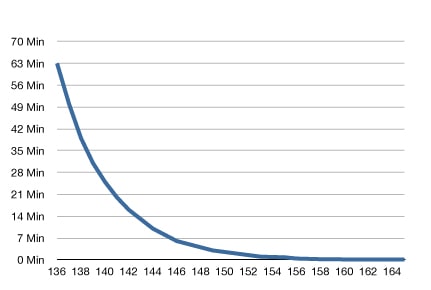
This concept is why the USDA recommends that chicken is cooked to 165°F, because at that temperature it takes only a few seconds for enough bacteria to die to achieve acceptable safety levels. In comparison, at 136°F it takes 63.3 minutes at that temperature to achieve the same safety level, something that is virtually impossible using traditional cooking methods. Using sous vide makes it possible to heat chicken and other meats to an internal temperature of as low as 130°F and hold it there long enough to kill the bacteria.
Please remember that this is assuming that your thermometer is exact and the water temperature is completely steady. I recommend always cooking foods at a little higher than the minimum temperature and a little longer than the minimum cooking time in order to account for any variance in temperature your equipment causes.
For more information about how long chicken, poultry, and beef need to be held at certain temperatures please refer to the USDA Guide mentioned in our Resources chapter. For more explanations of how this works you can reference the excellent guides by
Douglas Baldwin or
Serious Eats mentioned in our Resources chapter.
Sous Vide and Plastic Safety
Another main concern of sous vide is cooking in plastic and whether or not this is a dangerous practice. Many scientists and chefs believe that cooking in food grade plastic at these low temperatures does not pose any risk, the temperature is about equivalent to leaving a bottle of water in your car, or in a semi during transport, in summer.
However, I find it hard to believe that we know everything about how plastic reacts to heat, water, our bodies, and the environment. As such, I encourage you to read up on the safety of plastic in sous vide and plastic in general and come to your own conclusions about the safety of using these techniques or consuming products packaged or shipped in plastic.
Sous Vide Equipment
Sous vide cooking doesn't require much equipment, but what you do need can vary greatly in cost and function. Here are the main types of equipment needed and their costs.
We also have up to date information about sous vide equipment available on our website, including reviews.
You can see them here:
Sous Vide Equipment
Sous Vide Equipment Options
There are two types of equipment you need for sous vide cooking: heat regulators and sous vide pouches. Many people interested in learning sous vide cooking are turned off by the idea of expensive sous vide equipment. While it is true that much of the higher end equipment can get costly, there are now several less-expensive or even free options available.
We look at the entire range of options available when purchasing sous vide equipment, from using a pot on the stove with ziploc bags, to $150 "sous vide controllers", to $1,000 thermal immersion circulators and chambered vacuum sealers.
Just remember, you do not have to bankrupt yourself on expensive sous vide equipment. Start small and test the waters. If you like sous vide cooking then it might be worth spending a little more for some dedicated sous vide equipment.
If you are not concerned with the details of the specific equipment types, feel free to skip ahead to our Beginning Home Setup in the next chapter for our complete setup recommendations.
Food Sealers and Sous Vide Pouches
Note: please see the Plastic Safety section in our
Sous Vide Safety chapter for information about cooking in plastic.
Sealing your food in a sous vide pouch accomplishes many things. It can change the texture and density of certain foods. It can also make marinades and seasonings absorb more quickly into the food. However, with most dishes its main purpose is to ensure that the water in the water bath is as close to the food as possible and air is not interfering with the cooking process.
There are many ways to seal your food and here are the most popular methods with their advantages and disadvantages, as well as their corresponding prices. While there are certain applications that can only be accomplished with a powerful vacuum sealer, such as compressing foods, the majority of the sous vide benefits are gained through the low-temperature cooking and not from the sealing itself. This means that for most dishes a food-grade ziploc bag will be just as effective as a chambered vacuum sealer.
Food Grade Ziploc Bags
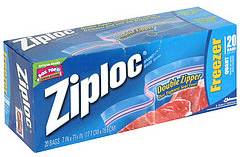
A great low-cost method of sealing your food is food-grade ziploc bags. They have a few drawbacks but work great for short cooked foods, especially if you are just getting started with sous vide cooking and do not want to spend any up-front money. In most cases sealing your foods with ziploc bags is also a lot easier than using a vacuum sealer.
The ziploc bags will normally have more air in them than the vacuum sealed bags but you can get out almost all of the air by holding the bag underwater, except for the final corner before sealing it. It is also easy to seal in liquids or marinades.
Ziploc bags do run into trouble when used for higher temperature cooking and you will need to check what the bag is rated for before cooking above 150°F to 160°F.
In general I recommend using
Ziploc brand freezer bags
since they are normally of higher quality than the cheaper brands and hold up better under heat. The freezer Ziplocs with the normal double seal work best in my experience and are normally rated for reheating in the microwave, which is normally at higher temperatures than sous vide. This is also the finding of the
French Culinary Institute and expressed in their Sous Vide Primer.
Food-Grade Plastic Wrap
The other easy method of sealing food for sous vide cooking is to wrap the object in many layers of food grade plastic wrap. This method will allow easy transfer of heat, similar to the vacuum sealed food, but the seal isn't nearly as strong. It will work fine for sous vide cooking for short amounts of time.
This method can also be used to shape foods such as salmon rolls, galantines, and other traditionally cylindrical foods.
Standard Home Vacuum Sealers
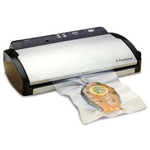
Many home cooks prefer a standard home vacuum sealer like a
Amazon.com
. These vacuum sealers work by inserting the opening of the sous vide food pouch into a small depression in the machine. The sealer then sucks the air out of the pouch and seals it using a heating element. They are the most cost effective method of vacuum sealing your food.
Preparing food with a standard home vacuum sealer gives you the advantage of sucking all the air out of the bag and ensuring maximum heat transfer between the water and the food. The biggest downside to these vacuum sealers is that the process of sucking out the air will also suck out any liquid in the pouch, making it much more difficult to tightly seal foods with marinades. Many home chefs will still use these sealers but seal the bag more loosely if there are marinades or liquids in the pouch, or the liquid can be frozen first.
There are many types of standard vacuum sealers, with
Tilia FoodSavers
being the most common brand. Tilia FoodSavers make a number of different vacuum sealers, most sold between $100 and $200. Some other less-expensive vacuum sealers are the Rival Seal A Meal and the Deni Vacuum Sealer, though they are usually of lower quality than the FoodSavers.
Chambered Vacuum Sealers
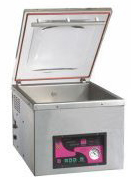
The preferred method of sealing your food for professional chefs is to use a chambered vacuum sealer. These industrial vacuum sealers make use of a large vacuum chamber in which the sous vide food pouch is placed. You then close the chamber and all air is removed and the bag is sealed. These are the kind of vacuum sealers normally used in professional kitchens.
The biggest benefit of chambered vacuum sealers is the ability to easily vacuum seal food with liquids or marinades in it, something the lesser sealers have trouble with. Another benefit stems from its finer tuned pressure controls, allowing you to manipulate the density of certain foods. However, these abilities come at a high cost and many chambered vacuum sealers are over $1,500.
Both Industria,
PolyScience and MSA sell respected chambered vacuum sealers under their brands and the Minipack-torre MVS31 chamber vacuum sealer is highly regarded. You can even get some from Amazon.com like the
VacMaster
.
Temperature Regulation in Sous Vide
Proper temperature control of the water bath is critical to effective sous vide cooking. Temperature fluctuations of a few degrees can drastically change the texture of many dishes, especially eggs and fish.
There are several ways to regulate water temperature and we'll discuss the positives and negatives of the main ones. The techniques range from inexpensive and inexact to incredibly precise with the price tag to match.
Thermal Immersion Circulators for Sous Vide
A thermal immersion circulator is a heating device that you put into a container of water that will keep the water at a uniform temperature. Thermal circulators were originally developed for use in laboratory work where precision heating is needed for many tasks.
Thermal immersion circulators are probably the best piece of equipment you can get for regulating water temperature in sous vide cooking, but also the most expensive.
How They Work
A standard thermal immersion circulator consists of a heating coil with an attached pump. The heating coil and pump are inserted into a body of water and a temperature is set on the immersion circulator. The heating coil will keep the water at the set temperature while the pump circulates the water to eliminate any hot or cold spots.
Each thermal immersion circulator has its own margin of error for holding the temperature. Most low-end circulators will hold the water at a +/- 1 degree Celsius, while some high-end circulators can hold the temperature to within +/- 0.01 degrees.
Advantages
The biggest benefit of thermal immersion circulators is their precision. Whether the circulator can regulate the heat from within 1 degree celsius or 0.01 degree, it is more than acceptable for perfect sous vide cooking.
Most thermal immersion circulators can also be attached to the edge of a normal kitchen pot, making them very convenient to use in sous vide cooking at home. They can also heat large amounts of water, up to 5x that of some other devices. They also tend to heat very quickly compared to other options.
Disadvantages
The biggest issue with thermal immersion circulators is the high cost of purchasing them. They routinely sell new ones for $800 to $1,500, and used ones are $200 to $600 which is pretty expensive for a piece of home kitchen equipment, especially one specific for sous vide cooking.
A minor negative of thermal immersion circulators is the evaporation due to not having a sealed lid. You can use foil or saran wrap to try and seal it better but you will still suffer some evaporation. This normally isn't a big deal unless you are using a 24+ hour sous vide preparation and then you will have to remember to occasionally add water.
Where to Buy
Probably the best known brand of thermal immersion circulators is
PolyScience, who has been tops in the professional market for awhile and has just released an immersion circulator for home chefs sold through Williams-Sonoma. Another established manufacturer of sous vide equipment is
fusionchef by Julabo, which makes the
FusionChef line of circulators and water baths. Another, well known Another well known company is Brinkmann, who makes the Lauda immersion circulators.
Grant also sells circulators.
Another option if you're mechanically inclined is to make one yourself. It can even cost under $100.
Seattle Food Geek has put together a great guide for this.
You can also look for used thermal immersion circulators on eBay and from scientific lab resell sites. If you do buy a used thermal immersion circulator, be sure to clean it properly since you never know what chemicals were used in it previously. For that reason, some people refuse to cook with previously used immersion circulators; do so at your own risk.
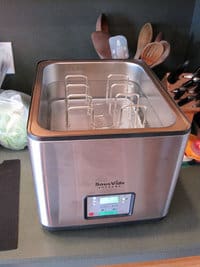
Thermal Circulating Water Bath

The other heavy duty way to regulate water temperature in sous vide cooking is through the use of a thermal circulating water bath. These devices are similar to the thermal immersion circulators except they come in their own enclosed container for holding the water. Like the immersion circulators, water baths were originally developed for the scientific lab where maintaining precision temperatures can be critical.
How It Works
A normal water bath consists of a lidded container of water with a built in thermal immersion circulator or other heating and circulating device. The container holds the water, and in sous vide cooking the food in a pouch, while the heating unit regulates the temperature of the water and removes all hot and cold spots.
Advantages
Since the circulating water bath has a sealed container it can help reduce evaporation during very long sous vide preparations. They also more easily keep the temperature of the water constant throughout the sous vide process since it is enclosed, requiring less electricity.
Every circulating water bath has its own margin of error for holding the temperature. Most low-end circulators will hold the water at a +/- 1 degree Celsius, while some high-end water baths can hold the temperature to within +/- 0.01 degrees. Either of which is more than enough precision for sous vide cooking.
Disadvantages
Much like the thermal immersion circulators, the largest issue with circulating water baths is their expense. They are also in the $800 to $2,000 range for new equipment.
Where to Buy
There are several places to get cooking specific water baths.
PolyScience makes well known thermal water baths.
Instanta also makes water baths. Another established manufacturer of sous vide equipment is
fusionchef by Julabo, which makes the
FusionChef line of circulators and water baths. As does
Grant.
Another option is the
Sous Vide Supreme "water oven" which is basically a non-circulating water bath and has many of the same advantages and disadvantages but it runs at around $450. Sous Vide Supreme has also just launched their new
Sous Vide Demi which is only $299 and comes in a variety of colors.
You can also look for used thermal water baths on eBay and sites that resell scientific lab equipment. If you do buy a used thermal water bath, be sure to clean it well since you never know what chemicals were used in it previously. For that reason, some people refuse to cook with previously used water baths; do so at your own risk.
Sous Vide Cooking Controller
While thermal immersion circulators and thermal circulating water baths are the undisputed leaders of precision temperature control they are out of the price range of many home cooks. Cooking controllers address this issue by providing decent temperature control for a fraction of the price. This device is pretty simple in principal and is used with a rice cooker, crock pot, slow cooker, or other similar device many home cooks have on hand.
How Sous Vide Controllers Work
The sous vide cooking controller is basically a plug with an automated on / off switch that is controlled by a thermometer. Here are the four steps to using it:
Take your slow cooker, crock pot or rice cooker and fill it with warm water.
Plug your slow cooker into the outlet on the sous vide cooking controller and turn it on to its highest setting.
Put the thermometer attached to the cooking controller into the water in the slow cooker.
Set the cooking controller temperature display to the temperature you want to maintain during the cooking process.
Finally, put the vacuum sealed food into the crock pot and let it cook for the specified time.
The sous vide cooking controller then turns the crock pot on and off to keep the temperature of the water in the slow cooker at a stable temperature.
Advantages
The low price tag is probably the biggest benefit to using a sous vide controller. Most are between $110 and $180, depending on the control desired. Both Auber Instruments and SousVideMagic11 sell similar types of sous vide controllers that are easily within the price range of most home cooks.
Sous vide controllers are used with your existing crock pots, slow cookers, and rice cookers, check the sous vide controller for specific brands supported. This is definitely a nice convenience and helps save money.
Most sous vide controllers can regulate the temperature to within 1 degree celsius, which is adequate for most sous vide preparations.
Disadvantages
The biggest downside of sous vide controllers is the lack of precision. While most of the producers claim their controllers maintain steady, even heat, they aren't as precise as the more expensive thermal immersion circulators or the thermal water baths, especially in short time frames. This is very noticeable in food like fish and eggs.
However, most people, including us, feel that the sous vide controllers do have enough precision for the home cook to produce excellent results in sous vide cooking, especially for someone looking to try sous vide out before investing large amounts of money.
Where to Buy
SousVideMagic makes a very popular sous vide controller and has very good customer service, tell Frank that CookingSousVide.com sent you. Auber Instruments also sells sous vide controllers for comparable prices. You can also find plans online to make your own.
Sous Vide on the Stove
The cheapest, and least precise, way to do sous vide cooking is directly on your stove. It only requires a stove, a thermometer, some hot water, some cold water, and a good amount of patience.
How It Works
Fill a pot with luke warm water. A larger pot is better since it will hold its temperature when the vacuum sealed sous vide packet is added and it will also be more stable while cooking.
Place a thermometer in the water, preferably a digital meat thermometer with a long cord so the thermometer is convenient and easy to read.
Add either hot water or cold water to bring the pot to the desired temperature. You can also briefly turn a burner on or add ice cubes if you need to move the temperature quickly.
Add the vacuum sealed sous vide packets and bring the water back up to the temperature you need.
Leave the food in the water for as long as the recipe says. Be sure to regularly check the water temperature to make sure it is where you want.
Advantages
The only real advantage of doing sous vide on your stove is that it is very cheap and doesn't require any special equipment.
Disadvantages
Cooking sous vide this way is very imprecise. No matter how diligent you are about checking the water temperature and adjusting it, it will definitely fluctuate by several degrees, and most likely 5-10 degrees. This can play havoc with the texture and doneness of certain types of sous vide food.
It also takes a lot of work to maintain a specific water temperature. You have to constantly be by the water, checking the temperature and adjusting it. This is fine for short cooking sous vide items like fish or some vegetables but for a longer term item it quickly becomes impractical.
Tips for Sous Vide on the Stove
Use a wooden spoon to regularly stir the water, making sure to go up and down as well as side to side. This will help to better even out the temperature of the water.
A larger pot will also hold its temperature better and have a more stable temperature.
"Beer Cooler" Sous Vide
Another very inexpensive way to do sous vide cooking at home is by using the "Beer Cooler" sous vide method. It was first popularized by J. Kenji Lopez-Alt of Series Eats. I'll summarize the method below but for a detailed discussion of it you can
view their article directly.
While there are many limitations to "Beer Cooler" sous vide, it is a great way for someone interested in sous vide to try it out without any upfront investment.
How It Works
In general, the beer cooler method takes advantage of a cooler's ability to maintain temperature. You heat water to the temperature you want to cook at and fill the beer cooler with it. At that point you can place the food you are cooking into it, in a sous vide pouch, and close the cooler. Most coolers will maintain its temperature for several hours, cooking the food.
Advantages
The main advantage is price. If you already have a cooler and ziploc bags then it is basically free to try.
Another advantage is that the water coming out of many home faucets is around 131°F-139°F, meaning it is the perfect temperature to cook steak in. If your faucet is in that range it just means you crank up the tap water, fill the cooler, and throw in the steak. It can be very simple.
Disadvantages
If your faucets run cold or you want to cook something at a higher temperature it can be a pain to get the water to the temperature you want.
The temperature also drops, albeit slowly, over time making it unsafe to cook with at the boundaries of food safety. This also makes it hard to cook long-time items with as the temperature will not hold up for multiple days.
Common Sous Vide Setups
With all the options for sous vide equipment available it can be hard to determine how to get stared. Some setups run thousands of dollars while others are only a few hundred. Here are a few of our recommended sous vide setups and the associated costs with each.
Interested in sous vide shirts, aprons, and mugs?
We have a bunch of different gear you can buy in our online store.
You can find the sous vide gear at:
Sous Vide Gear
Advanced Home Sous Vide Setup
This home sous vide setup has everything you need to create great sous vide results in your own kitchen. It's the most precise method and allows you to have great results on the more finicky dishes like eggs and fish. It also allows you to cook larger amounts of food because of its increased capacity.
If you are looking for a very good home sous vide setup then this one is for you.
Food Sealing
Home vacuum sealers can be found for $125+ and they make sous vide cooking much easier. While they fall short of the power and features of a chambered vacuum sealer they are about a thousand dollars less expensive and bring enough features to make it worth while. There are also many more reasons to get a vacuum sealer. We recommend the FoodSaver V2440, it's not the most recent version but it is consistently the highest rated and is less-expensive than the newer versions. Looking up the FoodSavers on Amazon and reading the reviews can be a great way to get a feel for how the different models respond.
Sous Vide Water Bath and Temperature Control
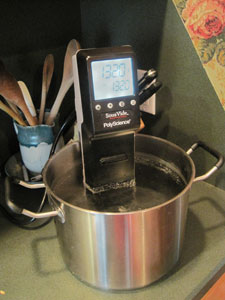
For this home sous vide setup we recommend an immersion circulator. They are very, very precise, heat up fast, and can heat large amounts of water. We have used the
PolyScience Sous Vide Professional, which is built for the home cooks, but there are other circulators with high marks as well14.
For your water bath you can either use a large pot or we suggest getting a sous vide water tub. They look like plastic storage tubs but are food grade quality. They normally run from $20 to $40 and will allow you to cook a larger amount of food than in a pot.
Cooking the Food Sous Vide
With this sous vide setup there are only two "hands-on" cooking moments required. The first is to preheat the water bath, this will help to keep a steady temperature in the water bath due to the way the sous vide controller works. The second is during long-cooking dishes when you occasionally rotate the food in the water bath, about every 6-10 hours if possible, and add some fresh water. That is all the effort you have to expend to have very high-quality sous vide food.
Total Cost
Vacuum Sealer: $150
Immersion Circulator: $800-$1000
Water Tab: $20 - $40
Total Cost: $1000 - $1,200 for the complete setup
Beginning Home Sous Vide Setup
This home sous vide setup has everything you need to create decent sous vide results in your own kitchen. It's by far the most cost efficient method for the home cook and requires very little effort to set up and use.
While this method can cost several hundred dollars to set up from scratch, many cooks already have some of the equipment on hand. Most of the equipment in this setup can also be reused for non-sous vide purposes so they are not just a single-technique item.
If you are looking for an inexpensive but relatively effective sous vide setup then this one is for you.
Food Sealing
For beginning sous vide it makes sense to start off with ziploc bags, as long as you feel comfortable using them. If you feel the need to upgrade to a vacuum sealer then you can approach that at a later date.
Sous Vide Water Bath and Temperature Control #1
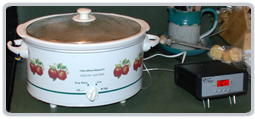
If you already have a large crock pot or rice cooker then we recommend using this Water Bath and Temperature Control.
The best water bath is a typical self-heating device, rice cookers are the best but crock pots also work very well. As long as the chamber is big enough for the size of food you will normally be cooking then you should be fine. If you currently own a rice cooker or crock pot then go ahead and use it, if not then I recommend starting with a rice cooker because it has better distribution of heat.
The most cost-effective way to control temperature is with a sous vide controller. There are many different brands but SousVideMagic has a good reputation and focuses almost exclusively on sous vide cooking. The sous vide controller works by measuring the temperature of your water bath and turning your heating device (the crock pot or rice cooker) on and off to maintain a consistent temperature. I've had great results with this even for short ribs that were cooked for over 48 hours.
Sous Vide Water Bath and Temperature Control #2
If you do not have a large crock pot or rice cooker then we recommend looking into the
Sous Vide Supreme. It is about the same cost as buying a SousVideMagic and a good rice cooker. It looks a little more professional or "appliance like" sitting on your counter and has very good temperature controls. Either this or the SousVideMagic will work well for you to get started.
Cooking the Food Sous Vide
With this sous vide setup there are only two "hands-on" cooking moments required. The first is to preheat the water bath, this will help to keep a steady temperature in the water bath due to the way the sous vide controller works. The second is during long-cooking dishes when you occasionally rotate the food in the water bath, about every 6-10 hours if possible. That is all the effort you have to expend to have very high-quality sous vide food.
Total Cost
Ziploc Bags: $5
Sous Vide Controller: $150
Crock Pot / Rice Cooker: $150
or Sous Vide Supreme: $450
Total Cost: $300 to $450 for a complete sous vide set up, assuming you don't have any of the equipment already.
Cheap Sous Vide Setup
One of the big misconceptions about sous vide cooking is that you have to spend thousands of dollars to do it. While it is possible to spend that much money you can also get a very good sous vide setup for much cheaper, or even for free.
This cheap sous vide setup can be applied to many dishes that don't require long amounts of cooking time such as many vegetables or most types of fish. However, you can't use this setup for most types of meat because of the constant work required to maintain the proper temperature and the fluctuations in temperature.
Food Sealing
For the cheap sous vide setup you can wrap the food in food-grade plastic wrap several layers thick, or even use a food-grade ziploc bag with all the air removed. If you already have a vacuum sealer such as a FoodSaver around then definitely use it to seal the food.
Water Bath
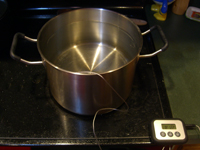
The cheapest way to set up a water bath is to use a pot of water on your stove. A large pot is easier to work with than a small pot since it maintains its temperature better. You can also try out the
Sous Vide Beer Cooler trick.
Temperature Control
Working with a thermometer it is pretty easy to maintain a temperature within a few degrees to either side of your ideal temperature. Leaving the stove on low, or turning it on and off, and adding ice cubes or cold water in small amounts allows you to keep the water temperature relatively stable. It won't stay within the .1 degree range that many devices can maintain but for short amounts of time it will do just fine.
I recommend using a meat thermometer with a cord, that way it's easy to keep it out of the way while you regulate the water temperature.
Cooking the Food Sous Vide
Once you put the food in the water, try to maintain the temperature that you are aiming for as closely as possible and you'll need to cook most dishes for 15 to 20 minutes, or up to an hour. Anything longer begins to become unmanageable.
Total Cost
About $25 for a thermometer if you don't already have one, otherwise it is basically a free method to try sous vide cooking.
This method of cheap sous vide is more time and effort intensive than other methods. However, it's a great place to experiment and see if you want to invest the few hundred dollars to move up to a basic "hands-off" set up with a sous vide controller that we recommend in the Beginning Home Sous Vide Setup section.
Sous Vide Tips and Tricks
While the majority of sous vide cooking is relatively simple, there are still many things to keep in mind that can increase your chances of success. Many of these tips also relate to all cooking methods.
For more tips and tricks you can visit our sous vide forums.
There's a lot of questions answered and information exchanged there.
You can find them on our website here:
Sous Vide Forums
Flavor
Always Salt and pepper
Salt and peppering your food before vacuum sealing it will only enhance the flavors of the finished meal. It's recommended for almost every dish to add salt and pepper before cooking it and as you are finishing it. Don't be afraid to taste your dishes as they come together to make sure they are properly seasoned.
Use Good Salt
Not all salts are made equal. For most recipes you should use kosher salt unless specified otherwise. Kosher salt isn't very expensive and the difference in taste and texture is very apparent. Also, stay away from the iodized salt, it will often impart a chemical flavor to your foods that can be off-putting.
Easy on the Spices
Because of the length of time sous vide cooking requires, especially for the tough cuts of meat, and the effects of the vacuum seal, spices can come across much stronger than they would in a roast or braise. It's better to err of the side of less and re-season after taking them out of the sous vide bath than to try and eat a dish that tastes like raw garlic.
Ingredients, Ingredients, Ingredients
You want to know what the secret to good cooking is? Use high-quality ingredients. The better the ingredients you use the better your resulting dish will be. This is even easier with sous vide since you will be perfectly cooking the food every time and don't have to worry about ruining it.
More and more farmers markets are opening up in cities everywhere and if you are planning a nice meal the extra flavor from locally grown fruits and vegetables (and even meat) is more than worth the extra money. To find farmers markets in your area you can check out the following links:
LocalHarvest.org,
Government List of Farmers Markets,
Farmers Markets Stats and Information
Fresh is Better
Another way to improve your dishes is to be sure to use fresh ingredients. If a recipe calls for lime or orange juice, instead of using bottled juice just grab a lime and juice it for the recipe, you'll be able to taste the difference.
Turn to the Powders
Using fresh herbs and spices instead of dried is normally a good idea when cooking. However, with sous vide it can be better to use the dried powders in some cases. This is especially true for things like garlic and ginger because the raw form of both can sometimes create a bitterness in the final dish.
Give it Some Smoke
If you are preparing a BBQ-style dish it can help if you smoke the meat before sealing it. Even 30-60 minutes in the smoker can add a lot of flavor to the final
If so, please join the more than 19,000 people who receive my exclusive newsletter and get a FREE COPY of my printable modernist ingredient cheatsheet.
Just click on the green button below!
Get Started!
Thanks for signing up! I look forward to sending you recipes, links, and exclusive content and offers that you can't find anywhere else on the site, and I'll send you a free copy of my modernist ingredient cheatsheet too!
Enter your first name and email below, and I'll see you on the inside!
Thanks for signing up! I look forward to guiding you through the process of discovering sous vide with amazing articles, recipes, and tips and tricks you can use to impress your friends and family by turning out amazing food time and time again!
Enter your first name and email below, and I'll see you on the inside!
 All sous vide cooking is done at temperatures below the boiling point of water and normally not above 185°F. You usually cook the food at the temperature you want it served at, so most settings are between 120°F and 185°F, depending on the food being prepared.
 Even though the amount of information about sous vide has increased a lot over the past few years it can still be hard to find specific information. While there is information out there on websites, forums, books, and magazines, there often isn't a single repository you can use to collect it. This has meant a lot of time lost on research before even getting started.
 Many home cooks prefer a standard home vacuum sealer like a
  The preferred method of sealing your food for professional chefs is to use a chambered vacuum sealer. These industrial vacuum sealers make use of a large vacuum chamber in which the sous vide food pouch is placed. You then close the chamber and all air is removed and the bag is sealed. These are the kind of vacuum sealers normally used in professional kitchens.
 The other heavy duty way to regulate water temperature in sous vide cooking is through the use of a thermal circulating water bath. These devices are similar to the thermal immersion circulators except they come in their own enclosed container for holding the water. Like the immersion circulators, water baths were originally developed for the scientific lab where maintaining precision temperatures can be critical.
 The cheapest, and least precise, way to do sous vide cooking is directly on your stove. It only requires a stove, a thermometer, some hot water, some cold water, and a good amount of patience.
 If you do not have a large crock pot or rice cooker then we recommend looking into the


