Sous Vide Thickness Ruler
Thanks for showing interest in my sous vide thickness ruler. You can download the ruler here and then follow the instructions below for the proper way to use it.
How to Use the Sous Vide Thickness Ruler
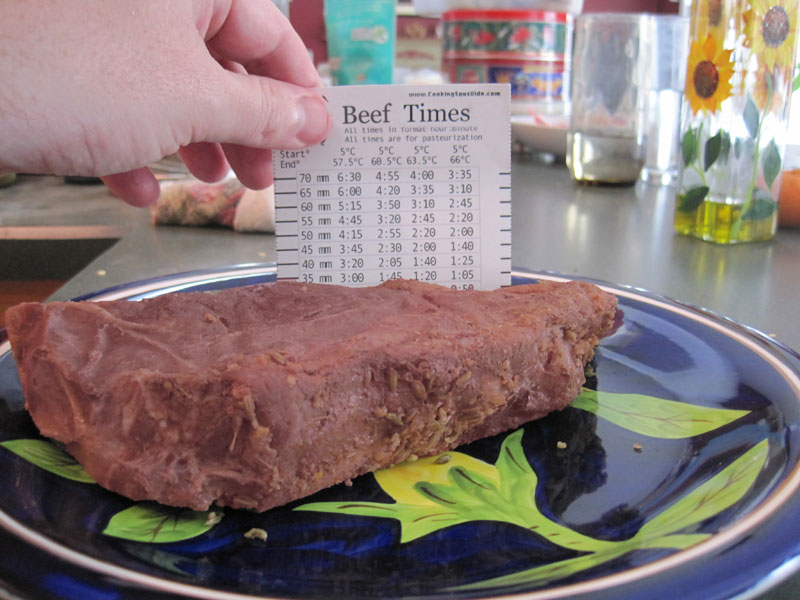
To use, simply print out the second page. I prefer printing it onto thick card stock so it's more rigid. You then cut out the cards by following the dotted lines. Try to make the bottom as level as possible to ensure accurate measurements. I like to align a ruler along the line and draw a knife along it, just make sure you do it on a cutting board!
I also recommend measuring the lines to make sure they are still correct. I've tested the printing out of several programs, on PC and Macs, and on various printers and it normally comes out properly but double checking never hurts. Sometimes a program will try to scale the image, which will result in distorted measurements.
Want a Fancy Plastic Version?

The Sous Vide Timing Ruler is made of durable PVC Plastic which means it is 100% waterproof so you can clean it with a damp cloth or a soapy dish scrubber. Plus it's cheaper than a ruined steak!
Once it is cut out, simply hold the card up to the thickest point of the food you are preparing to cook and follow the time listed in the column you want.
For example, if you wanted to heat a piece of beef tenderloin you would hold the Beef card up to the beef. If it is 35mm thick you would then cook it for an hour and forty minutes if it was in the refrigerator or two hours if it was frozen. Remember, these are the minimum times needed, you can cook it for an hour or two longer if you aren't in a hurry.
For more information about sous vide thickness times including where they came from and what they mean you can check out my article on sous vide cooking times by thickness.
This ruler was inspired by the thickness ruler done by PedroG at the sous vide wiki.
If so, please join the more than 19,000 people who receive my exclusive newsletter and get a FREE COPY of my printable modernist ingredient cheatsheet.
Just click on the green button below!
Get Started!
Thanks for signing up! I look forward to sending you recipes, links, and exclusive content and offers that you can't find anywhere else on the site, and I'll send you a free copy of my modernist ingredient cheatsheet too!
Enter your first name and email below, and I'll see you on the inside!
Thanks for signing up! I look forward to guiding you through the process of discovering sous vide with amazing articles, recipes, and tips and tricks you can use to impress your friends and family by turning out amazing food time and time again!
Enter your first name and email below, and I'll see you on the inside!


